Hancock County Master Gardeners Association

Gardening, Plants, and Helping Others Grow

Ask a MG
Backyard Botanist
Public Calendar
Resources
Follow Us
  • Home
  • Become a Master Gardener
  • Monarch 911
  • Community Activities
  • Scholarship
  • Newsletters
  • YouTube
  • Who We Are
  • Contact
  • Members Only
  •  

Poinsettias

November 24, 2016 By Elaine 1 Comment

poinsettia-557704_640With the Christmas holiday approaching, we will start seeing a popular holiday plant everywhere we go.  If you’ve ever wondered how the poinsettia became associated with Christmas, here’s a little history.  And if you’ve ever wondered about how to care for these plants, here’s a little information.

The poinsettia is a member of the Spurge family; the botanical name is Euphoria pulcherrima.  It is native to Mexico.  It’s common name refers to the man who introduced it to the United States in 1825, Joel Roberts Poinsett, first United States Minister to Mexico.

The poinsettia is described as a small shrub or tree (2 to 13 feet).  The flowers of the plant are actually the small yellow structures in the center of each leaf bunch, called cyathia.  The colored bracts are actually leaves of the plant.   The colors are created through photoperiodism–requiring  12 hours of darkness at a time for at least five days in a row.  At the same time, plants require abundant light during the day to ensure the brightest color.

The Aztecs called the plant Cuetlaxochitl (the flower that grows in residues), and used it to make a red dye and also as an antipyretic (fever reducer).

The poinsettia’s association with Christmas began in 16th century Mexico.  Legend has it that a poor young girl was inspired by an angel to gather weeds from the roadside  and place them on the church altar.  Blossoms sprouted from the weeds and became  poinsettias.

The poinsettia industry in America began with Albert Ecke who emigrated  from Germany to Los Angeles in 1900.  He sold poinsettias from street stands.  His son, Paul, developed the grafting technique that made the plant more full and compact.  In its natural habitat, the plant has an open and more weedy look.  Ecke’s technique caused every seedling to branch, resulting in a bushier plant.  Paul’s son, Paul Jr., was the marketing genius behind the business.  He promoted the poinsettia, appearing on television programs like the Tonight Show and Bob Hope’s Christmas specials.  The Eckes had a monopoly on the poinsettia market until the 1990’s when a university researcher discovered the Eckes secret method and published it.  The Eckes no longer produce plants in the U.S. but still serve a significant percent of the market (70% domestic and 50% worldwide).

In the Midwest, poinsettias can spend the summer outdoors but must be brought inside before night temperatures reach 55 to 60 degrees F.   During the winter season,  poinsettias need about 6 hours of daylight.   Keep them away from cold windows and warm or cold drafts (radiators, air registers, open window and doors).  When transporting a poinsettia outside in the winter, cover it with a plastic sleeve to protect it from the cold.  Inside temperatures should be 60 to 70 degrees F. during the day and 55 degrees F. at night.  High temperatures can shorten it’s life as well.

Water when the soil is dry; make sure there is sufficient drainage from the pot.  Do not fertilize when the poinsettia is in bloom but you can apply a houseplant fertilizer once a month if you keep it past the holiday season.

If you wish to keep the poinsettia to rebloom the following winter, in February or early March, cut each of the flowering stems back to 4 to 6 inches to promote new growth.  In May, repot to a slightly larger pot.  Water and place in a sunny window until all danger of frost is passed and night temperatures are above 60 degrees F.  Leave the plant in the pot and sink it into a protected flowerbed in a shady location where it receives some morning sun.  Periodically turn the pot to keep a uniform plant shape.  Every 3 to 4 weeks, pinch out the top 1/4 inch of the growing shoots to encourage  branching.  Leave two or three fully expanded leaves below the pinch.  Continue pinching back until August.  Water regularly  and fertilize every two weeks with a soluble fertilizer (20-20-20 is recommended).  Before night temperatures fall below 55 to 60 degrees F. lift the pot and drench with water to remove any pests.  Place in  the house in a sunny location.  Keep the soil  moist but reduce fertilization.

Because  flower initiation depends on  the length of darkness, the poinsettia must be kept in complete darkness from 5 p.m. to 8 a.m.  Any extraneous light will interfere with flowering.  To insure the poinsettia flowers at Christmas, the dark treatment must continue from the end of September to December 15.  Once the flowers develop and the bracts show color, it is not as important to continue the giving the dark period but be sure to continue until the bracts are almost fully developed.

If you have a full and active life, reblooming a poinsettia might be something you would not care to undertake as it is rather regimented and time-consuming.   My preference is to go shopping each Christmas season and pick one (or more) of the variety of colors that are available from a local nursery or big box store.  In March, when the plant has died a natural death (are least that is when it happens at my house), I place it in the composter and start thinking about the Spring planting season.

Filed Under: Backyard Botanist

Seed Saving-Preparation for Storage

October 26, 2016 By Elaine Leave a Comment

Seeds are usually dry within three weeks and ready to prepare for storage.  You will want to separate seeds from other plant material.  Shake the seeds free gently.  Seeds that don’t come free easily are not mature or may be infertile.

Clean the seeds before packing and storing.  Most seeds can be cleaned by three methods.

  1.  Sieving.  This removes hairs, grains of sand and miscellaneous plant material.  Standard kitchen sieves can be used.
  2.  Winnowing.  This method removes underdeveloped or infertile seeds, and miscellaneous debris; viable seeds tend to be heavier.  Place the seeds in a shallow cardboard box and blow lightly across the surface, removing debris while leaving the seeds.
  3. Hand-picking.  Tip the seed sample  onto a sheet of white paper or light-colored card.  Carefully  separate the good seed from bad with the point of a knife.  This can be tedious.

Put the clean, dry seeds into paper envelopes with securely sealed corners.  Clearly  identify the seeds by writing on the name of the plant, dates and locations where collected, and other useful information.   Avoid using water-soluble ink; pencil is more reliable.  Stick-on labels may not adhere long-term.

Storing Seed

Short-term storage of seeds can be accomplished for most seeds by storing them in paper bags or envelopes (as mentioned above) in a drawer in a warm, dry room.  Seal the corners with masking tape to prevent seeds from falling out.  Don’t store them in an unheated shed where humid conditions can cause mold growth and the subsequent loss of seeds. 

Long-term storage can be accomplished with small, dry orthodox seeds.  They are not usually damaged by below-freezing temperatures.   The drier and colder the conditions, the longer the storage life.  Seeds can be placed in an airtight box with a desiccate such as silica gel which is safe and easy to use.  Such storage boxes can be removed from the freezer for several weeks if freezer space is needed temporarily, provided the dry atmosphere inside the box is maintained.  Silica gel crystals may get saturated with water and blue indicator crystals may turn pink.  Refresh the silica gel by pouring the crystals into a shallow baking pan and bake at 300 degrees Fahrenheit for two to three hours.  Baking will reactivate the crystals and they can be returned to the box of seeds and packed back into the freezer.  This system of storage is essentially the same as that used at seed banks.  Keeping temperatures at 5 to 10 degrees Fahrenheit ensures prolonged viability.  Some seeds can live indefinitely in these conditions.

Testing Viability

A seed germination test can be done a couple weeks before seeds are to be planted.  Sow a sample of seeds on a damp paper towel in a plastic box with a tight-fitting lid.  You can set out pinches of  different seed in a grid pattern and put the box in a warm environment  (64-75 degrees Fahrenheit).  If a high proportion of seeds in a cluster germinate within a short time and produce healthy seedlings, consider the seeds to be viable.  If seeds do not germinate within two weeks but appear firm and unchanged,  they may still be viable.  If most seeds in a cluster are moldy after two weeks or disintegrate when squeezed between finger and thumb, they are not viable.

Some seeds with hard coats may need a fragment of the coat removed with a knife before they will germinate.

Collecting and cleaning seeds in fleshy fruits will be covered in a future article.

[Read more…]

Filed Under: Backyard Botanist

Saving Seed

October 23, 2016 By Elaine 2 Comments

At the end of the growing season, you may be thinking about saving seed from a particular plant from your garden that you can sow next year.   Saving seed is not difficult to do but some care must be taken to insure the viability of the seed to reproduce the following season.  Keep in mind that the seed produced by many hybrid plants may not produce the same variety of plant as the parent plant.

First, a couple seed definitions.  Seeds fall into two groups–orthodox and recalcitrant.  The names refer to the response of seeds to long-term storage in dry conditions at subzero temperatures.

Orthodox seeds are dry, usually small, and comprise the great majority of seeds.  They are responsive to their surroundings and can deteriorate rapidly when stressed.   They also are able to survive intense desiccation and can survive decades, sometimes centuries under favorable conditions.

Recalcitrant seeds are moist and usually large (most nuts, acorns, etc.).  They remain alive only while moist.

We will concentrate the discussion on dry or orthodox seed collecting.

There are three principles to collecting and cleaning dry fruits.

  1.  Collect only when ripe, usually indicated by the appearance of the fruits.  Dry fruits change from green to yellow as they desiccate.  As they mature they will turn straw-colored or brown.  There can be exceptions to this rule.  Some members of the Buttercup family are collected  in an immature state as they produce seedlings more readily.   Hellebores release seeds before they are completely dry.
  2. Collect only in fine weather when plants are dry.  Wet seeds are more prone to mold.  If this is unavoidable, seeds should be immediately dried by spreading on sheets of paper towel and on a radiator or dry, airy room with low level heat for several days.  Don’t put in a hot oven to dry!
  3. Try to collect seeds, not unwanted material such as pieces of the plant, soil, sand, or dead leaves.  If debris is sown with the seeds, it can provide sites for infection by pathogenic fungi.

Orthodox seeds should be kept in dry, well ventilated conditions until they lose surplus moisture.

Suitable post-harvest containers can be:

  1.  Unglazed brown manila paper bags.  Make sure the corners are sealed.  You can place the cut ends of spikes and capsules in the bag while they are drying, leading to the release of seeds into the bag.
  2. Seed trays can be lined with paper to hold bulkier collections.
  3. Plastic pots with paper or polystyrene cups.  These are convenient for small quanties.  Be careful to secure to avoid spilling.
  4. Plastic bags only for succulent fruits–not for seeds from  capsules and other dry fruit.

NOTE:  Sealed containers do not allow the escape of water vapor and can create conditions for mold growth.

Numerous plants (geraniums, some members of the pea family,  violas, acanthus, streptocarpus, and impatien) distribute their seeds ballistically.  They have structures that spring open and hurl their seeds.  They should be stored in a closed bag to prevent the ripe seed from being scattered.

Preparing the seed for storage will be covered and an article to follow soon.


Filed Under: Backyard Botanist

Fall Garden Tips

September 21, 2016 By Barbara 3 Comments

The cooler temperatures of fall make this season ideal for working in garden and landscape. Fall is an excellent time for setting some types of plants and for preparing the lawn and garden for the coming spring.

Planting

Add fall color to your landscape with cool-season plants such as asters, pansies, kale, and chrysanthemums.

Autumn is an excellent time to plant trees and shrubs. The roots can become established before the heat of the summer begins.

Plan ahead for spring color by planting hardy bulbs such as daffodils and tulips. Such bulbs require a cold dormancy before starting new growth in the spring. The best time to plant hardy bulbs is at least six weeks before the ground freezes.

Plant garlic cloves six to eight weeks before the first hard frost. The garlic will overwinter and be ready to harvest in late summer.

Preparing

Lift sensitive bulbs and tubers and store in a frost-free environment. For example, in Indiana, canna rhizomes should be lifted after the first hard frost and stored in peat or soil. Keep the soil barely moist and store in a temperature of around 45 degrees Fahrenheit.

Fertilize your lawn. September and November are the two best times to fertilize a lawn in Indiana. Fall nitrogen promotes good root development, enhances storage of energy reserves, and extends color retention in cool-season lawns. Most of the benefits from late fall nitrogen will be seen next spring and summer.

Clean up your garden. Bag any diseased plant matter and compost or bury any healthy plant matter. Remove weeds before they have a chance to seed. Many perennials benefit from a fall trimming, but research how and when to trim each type of perennial for the best benefit from trimming.

Cover your garden. Mulched leaves make a good ground cover. You can also plant a winter cover crop on your vegetable garden. These crops should be cut in early spring before they seed.

Remove and store garden structures such as tomato stakes and cages and vegetable trellises. Wood structures left outside will decay, and metal structures may rust. Examine structures for damage, and repair them or re-purpose usable parts.

Take an inventory of gardening supplies so you know what to purchase in the spring. If you have storage room, look for discounts at garden centers and buy ahead for the next year.

Filed Under: Backyard Botanist

Iris leaf Spot

September 10, 2016 By Elaine 1 Comment

irisleafspot2
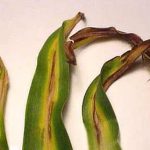
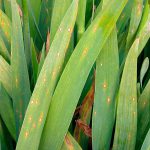
Another plant disease that is caused by warm, humid conditions is Iris Leaf Spot.   Like Daylily Leaf Streak,  Iris Leaf Spot is caused by a fungus but this one is known as Mycoshaerella macrospora (formerly Didymellina macrospora).  As is the case with the daylily disease,  Iris Leaf Spot will not necessarily kill the plant but, over time, cause a weakening of the plant and reduce it’s capacity to thrive and bloom.

Typically,  the leaves of the iris are attacked by the fungus but, occasionally, the flower stalks and buds can be involved.  Leaf Spot reveals itself with reddish spots with surrounding tissue that, at first, appears water-soaked.  After flowering, the spots enlarge and may coalesce to cause death to leaf tissue.

As with other fungal diseases, the fungal spores are spread by wind and splashing water.   The fungus over-winters in leaf debris.  Removing the debris and disposing of it is one strategy to control the disease if there is minimal infection.   Plants  that are heavily infected may benefit from the application of preventative fungicide sprays.   Chlorothalonil or myclobutanil are recommended.   Start spraying the young leaves in the spring and repeat applications as directed on the fungicide label.  Since iris leaves are waxy, it is recommended that dish soap be added to the spray solution to ensure good coverage.  Most dish soaps contain surfactant.  Surfactant breaks up surface tension (think grease-cutting).  Thus, the addition of dish soap will assist in breaking the bonds of the waxy leaf surface and cause the fungicide to stick to the leaf surface.

Thinning and relocating plants to where they receive more air circulation will help prevent the conditions favorable to the development of fungal diseases.  And don’t forget that fall is a good time to lift and thin iris tubers regardless of disease prevention.  Doing so encourages new growth and healthier plants the following growing season.


Filed Under: Backyard Botanist

Time to Look for Tree Pests

August 22, 2016 By Elaine Leave a Comment

As if Indiana homeowners, businesses and municipalities haven’t had enough to worry about in their landscapes since the Emerald Ash Borer  (EAB) invasion started several years ago, there is now another insect threat that is approaching.   It is  known as the Asian Long-horned beetle  (ALB).  Like the EAB, they attack trees but this critter prefers maple species, including boxelder, Norway, red, silver, and sugar maples.  They are also known to attack birches, Ohio buckeye, elms, horse chestnut, and willows.  According to the U.S Forest Service, a complete list of host trees has not yet been determined.   It does take much imagination to realize this insect is a substantial threat to Indiana’s tree population.   Combined with the damage from the EAB, Indiana could lose as much as 75% of its street trees and a substantial portion of its forests.   The spread of both pests is a result of the movement of infected firewood.   While the ALB has not yet been reported in  Indiana, it has been found in the Chicago and Cincinnati areas.  The key to containing its spread is early detection.   Therefore, the U.S Department of Agriculture, Animal, and Plant Health Inspection Service is asking  people to take time to examine trees on their property for these pests.  August appears to be a prime time to do this.   Reporting infestations can be done with a smartphone, computer or a phone call.   In Indiana,  the phone number is 1-866-NO-EXOTIC or a few clicks on the free Great  Lakes Early Detection Network smartphone app.  Purdue has a YouTube video to demonstrate the ease of using the app to alert authorities.

Now all you need to know are the signs of ALB infestation.   Your inspection should focus on the tree trunk and branches; the leaves will often appear normal.   There will be perfectly round holes the size of a dime with fine piles of sawdust shaving coming out of the holes or in piles on branches or the base of the tree.  Also, you may notice dark pockmarks on the trunk or branches accompanied by wet and bleeding sap.  The ALB is easy to recognize as a shiny black beetle with white spots and black and white antenna that are longer than the insect’s body.  The beetle  itself measures about 1-1 1/2 inches long.ALB

The difference in damage caused by the EAB is distinct from the ALB.   The EAB  attacks ash trees and those tree will have dead and dying branches near the top of the tree.  Other clues are woodpecker holes, vertical splits in the bark and D-shaped exit holes.  During  late summer, symptoms become more apparent when infested trees are too stressed to maintain a fully leafed canopy.

While the EAB  has been difficult  to control in Indiana, concerned citizens can help stop the spread of the ALB by reporting any infestations.   Because of their efforts, the ALB has been contained oreradicated in four different states.   It is vital to have public involvement to help protect the trees of Indiana.

Filed Under: Backyard Botanist

Daylily Leaf Streak

August 14, 2016 By Elaine 2 Comments

The Hancock County Master Gardener Association maintains a daylily garden on the grounds of the Hancock County Extension Service.  Earlier this spring we noticed some yellow/brown streaking down the length of the daylily leaves.   After some investigation between one of our members and our Extension Educator, a diagnosis of the problem was made.   It was Daylily leaf streak.   Several of us went home to inspect our own daylilies and, unfortunately, discovered the problem existed outside of our demonstration garden at the Extension Service.   Some of you may have noticed similar signs of disease on your own daylilies this year, especially since conditions have been ideal for the development of this fungal disease.   Those conditions include warm, wet weather.   The culprit pathogen responsible for this problem is Aureobasidium Microstictum?leafstreak2

Typically, leaf streak is a cosmetic problem but, in some cases, it can cause significant leaf loss, eventually weakening the plant.   Along with yellowing that begins at leaf tips and spreads along and outward from the mid veins of the leaves, red/brown spots may also be present.   These spots enlarge and turn brown, then become surrounded by yellow halos.daylily_leaf_streak

The fungal pathogen that causes this disease can over-winter in leaf debris, producing spores that infect new leaves each spring.

Control of the disease includes removing infected leaves as they appear.   Fertilizing and adequate watering will encourage new leaf growth.   However, avoid watering overhead with a sprinkler as this can spread the pathogen.  Instead, use a soaker hose or drip hose.   Also, avoid working with infected plant material when wet as this can spread the disease.   To eliminate a source of the disease, cut back the dead leaves in the fall and remove the leaf debris.    You can burn (where allowed, deep bury or hot compost the debris.   Placing debris in plastic trash bags for removal is another option if the other options are not available to you.   Further actions to reduce the chance of re-infection is to divide plants and replant, leaving more space between plants to improve air circulation and drying of leaves.

If the problem persists every year, consider applying a fungicide containing chlorothalonil, mancozeb, or thiophanate-methyl (read the labels before purchasing).  Treat only during periods of wet weather.   By that, I don’t think the experts are recommending applying the fungicide in a downpour but during periods when there has been frequent rain and humidity.   You can also start applications before symptoms appear.   Then treat every seven to fourteen days as long as wet weather persists.    To be most effective, alternate the use of at least two active ingredients to minimize the development of resistant strains of the fungus.   As always, read and follow label instructions of the fungicide to insure safety as well as effectiveness.

Stay tuned for more articles on plant diseases caused by warm, humid conditions.

Filed Under: Backyard Botanist

Quick Gardening Tips

June 1, 2016 By Barbara Leave a Comment

Vegetables do best when growth is consistent through the season, not slowing and speeding up due to environmental conditions. You can’t control the weather, but you can help provide consistent conditions by irrigating when rainfall is lacking. Most vegetables need 1-1.5” of water a week.

Side-dressing is an appropriate way to fertilize vegetables during the growing season. To side-dress a plant, sprinkle granulated fertilizer around the plant, about 6 to 8 inches from the stem, or put the fertilizer in a narrow furrow down the row of plants. Follow carefully the instructions on the fertilizer package. Too much fertilizer will harm the plant, and too little will not give you the desired results.

September and November are the two best times to fertilize a lawn in Indiana. Fall nitrogen promotes good root development, enhances storage of energy reserves, and extends color retention in cool-season lawns. Most of the benefits from late fall nitrogen will be seen next spring and summer.

You can plant vegetables in long slender rows, in squares, or in any other shape that makes sense in your garden. Tall plants should be on the north side of the garden so they don’t shade their shorter neighbors. The correct spacing will give your vegetables room to grow.

Pruning fruit trees is essential for healthy and productive trees. Not all fruit species grow the same way. Once the trees are mature enough to flower and bear fruit, apples, pears, cherries and plums generally tend to produce the best crop on wood that is 2-3 years of age. However, peaches tend to produce best on 1-year- old wood. So, the goal in pruning the home orchard is to keep a good amount of the appropriate-age wood for that particular species. Late March is an ideal time for fruit tree pruning, allowing time to assess the toll of winter, yet early enough to allow for fast healing of wounds, without pressure from insect pests or disease.

Trees can be chosen for energy efficiency as well as for beauty. In Indiana, the best choices for trees near the house on southern exposures are deciduous-canopy trees. Since deciduous trees lose their leaves in the autumn, these will provide shade in the summer but will not block out the warming effects of the sun during winter months.

When choosing annual or perennial flowering plants, pay close attention to the amount of sun needed. Sun-loving plants that are placed in the shade tend to be spindly, and shade-loving plants that are placed in the sun often become scorched by the heat.

Many plants found in Indiana gardens are not native to Indiana. Be careful not to introduce non- native plants that can spread aggressively. Such invasive plants eventually disturb the natural ecology. A list of invasive plants to avoid in Indiana is found at www.ppdl.purdue.edu.

Vegetables, flowers, and herbs may be annuals, biennials, or perennials. Annuals live for one year, and often produce seeds that can be planted the next year. Biennials live for two years, producing only leaves in the first year and flowers and seeds in the second year. Perennials live for more than two years.

Filed Under: Backyard Botanist

Native Woodland Plants

May 9, 2016 By Elaine Leave a Comment

After a long winter it is always a welcome sight when the Spring native plants awaken, make their way through the leaf litter, and eventually bloom. In the native woodland area of the Hancock County Extension office grounds, we are seeing signs that Spring is here. This small area along a fence line with several mature trees has been the home of some interesting native plants for over ten years. The planting of this area was done by a couple past Master Gardeners and, as the plants have matured, it’s a pleasant place to be on a spring day. Let’s take a look at just a few of the species that are included in the area and their growing requirements. While Mother Nature is the ultimate landscaper, you can create some beauty in even a small wooded area of your landscape.

cutleatToothwort
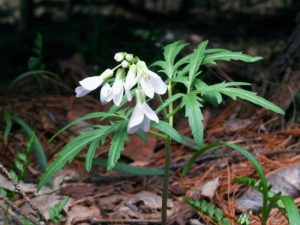
Cutleaf Toothwort (Dentaria luciniata)

This plant is considered a spring ephemeral (plants that flower in Spring and then go dormant for Summer). It grows 8-16 inches tall and blooms in early spring. Light requirements are partial to full shade. It spreads well on its own in rich humus soil but can be propagated by sowing seeds when they are fresh or by dividing the rhizomes. Plant the rhizomes horizontally 2 to 3 inches deep and mulch. It requires adequate moisture but not wet soil. Grows well with Trout Lily.

troutLily
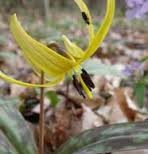
Trout Lily (Erythronium americanum)

Another spring ephemeral, Trout lily grows 4-10 inches tall and blooms in early spring. It likes shade to filtered sun. It also is known as adder’s tongue and dogtooth violet. This plant can be started from fresh seed but can take years to flower (usually 7-8 years). You will get flowering sooner by dividing root offshoots in the fall (be sure to mark the lily in the spring before it goes dormant). Plant the offshoots or bulbs 3 to 5 inches deep. Bulbs delve deeper as they mature. It requires rich woodland soil, slightly acidic to neutral (pH 5-6). Dig in lots of compost when planting. It tolerates moist to dry conditions.

woodPoppy
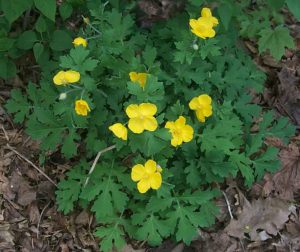
Wood Poppy (Stylophorum dyphyllum)

Sometimes referred to as Celandine Poppy. (Do not confuse it with a non-native and invasive known as Lesser Celandine (Chelidonium majus). This plant grows 1-1.5 feet tall. Light requirements are shade to partial shade. It blooms profusely in spring and may bloom with less frequency during the summer if grown in a reasonably damp area. It self-sows readily but can be divided in spring or fall. Plant rhizomes with the “eye” 1 inch below soil level and mulch. Wood Poppy likes soil on the moist side. It requires little care except for occasional mulching and adding compost to regenerate the soil.

wildGinger
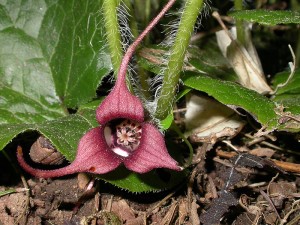
Wild Ginger (Asarum canadense)

Wild Ginger is a ground cover about 6 inches tall. It prefers full to partial shade. It’s flower is found beneath the foliage. The seeds can be planted in early to mid summer while still fresh or the rhizomes can be planted horizontally about ½ inch deep. It self-sows readily. Rich, neutral to slightly acidic (pH 5.5 to 6.5) soil is preferred by the plant. Otherwise, it needs little care.

Filed Under: Backyard Botanist

  • « Previous Page
  • 1
  • 2

Ask A Master Gardener

Debby asks; Bugs are eating my petunias this year. Any idea what bug this is (see attached photo) and how I can get rid of them safely?

Jan asks a question about Moon Flowers

Brian wants to know what are the brown spots on his hydrangea

Can you help me identify this flower?

Sara is concerned-Black lilac leaves and growth on elm tree bark

Backyard Botanist

Growing & Using Garlic

IUPUI Seed Library – Library of Things

GARDEN SOMETHING NEW TO FIGHT THE COVID-19 BLUES!

Drone Farming

Water for Gardens

View Upcoming Events


Subscribe To Our Blog

Enter your email address to subscribe to this blog and receive notifications of new posts by email.

Designed by CCM · Log in