Hancock County Master Gardeners Association

Helping Others Grow

Ask a Master Gardener
Public Calendar
Resources
Follow Us
  • Home
  • About Us
    • Become a Master Gardener
    • Educational Recordings
    • Newsletters
    • Who We Are
  • What We Do
    • Community Activities
    • Monarch 911
    • Scholarship
    • Soil Squad
  • Contact Us
  • Members Only

From Bobbi; Help-Early Blight On Tomatoes

June 29, 2020 By Don

What is your question for a Master Gardener?

I have a gardening question. The last few years I’ve gotten early blight fungus that has affected my tomatoes. What can I do to get that out of my soil? I’ve rotated my crops. I only have a 10X10 garden space.

Tomato leaf with spots that are round, brown and up to half inch in diameter. Larger spots have target like concentric rings and tissue around spots is yellow

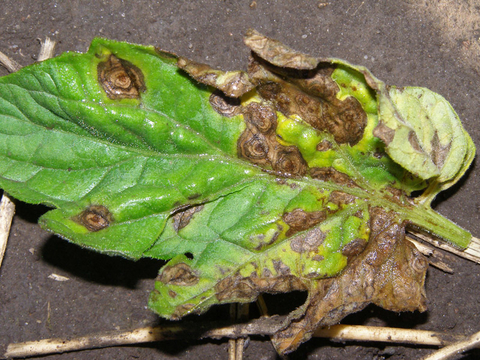
                            Tomato leaf with Early Blight Disease

Researched and answered by Advanced Master Gardener Bruce.

Thanks for your question Bobbi. Unfortunately there is no known practice to eliminate Blight, but there are things you can do to help lessen the effect of Blight:

Rotate your tomatoes every year

Remove all parts of the tomato at the end of the season and turn the soil to help bury the blight spores.

Plant blight resistant varieties. The variety will not eliminate blight, but the plant is more resistant to the disease.  Use link to view varieties http://vegetablemdonline.ppath.cornell.edu/Tables/TableList.htm

Water tomatoes at the base of the plant instead of watering from above soaking the leaves.

Mulch around the tomato

Remove the lower leaves on the tomato plant. Leave about 12 inches from the leaf to the soil. Water will splash the fungus from the soil onto the leaves.

Prune to aid in air flow through the plant. See the following Purdue link for more information.

https://ag.purdue.edu/btny/ppdl/Pages/Tomato-Blight.aspx

Good luck Bobbi! We are always here to help.

—
Bruce

Filed Under: Ask A Master Gardener

Fruit Tree Questions

May 10, 2020 By Don

Amy asks several questions for proper care of her fruit trees.

Response by Master Gardener Bruce:

Hi Amy,  Thanks for your your question about your fruit trees.  It’s good that you have cut the dead out of your pear tree.  You may want to prune it to maximize your pear production. The best time to prune is late winter. Here is a link for pruning a pear tree. https://www.goodfruit.com/the-1-2-3-rule-of-pruning/

So you haven’t seen any plums on your tree yet?  It normally takes 4-6 years before the tree will start to fruit.  It has been growing long enough so there must be another factor causing your plum not to bear fruit.  If you know the variety, look it up online and check the following:  Is it an ornamental plum?  If it is an ornamental then it will not bear fruit.  Will the variety self pollinate or do you need a second tree for pollination?

The most common cause is frost damage.  They bloom earlier than most of the other fruit trees which makes it more susceptible to frost damage.  This year on April 15 & 16 the temps dived to 25 degrees. That pretty much destroyed your crop for this year.  It may have been the case last year as well.  I read where someone put Christmas tree lights on the tree to help keep the temp above 32 degrees.  You can also put sheets on some of the branches to help protect the flowers if it happens again. With the change in weather patterns, I’m sure it will happen again.

If you have any further questions, don’t hesitate to write back.–

Bruce

Filed Under: Ask A Master Gardener, Trees

Strawberries Didn’t Bloom and Produce

September 27, 2019 By Don


This is a question asked by Julie, a strawberry gardener:

Hi, if my ever-bearing strawberries (planted this year) didn’t bloom and produce, should I leave them and see if they produce next year? Thanks! Julie

Answer by Master Gardener Bruce:

Hi Julie,  Thanks for your question about unproductive strawberries.  Newly planted strawberries may not flower and produce the first year.  They need to get established before they will give you ripe luscious strawberries.  Mulch them this winter, and you should have a nice crop next year.  If you fertilize, use something like a 10-10-10 fertilizer.  To much nitrogen, the first number in fertilizer, can cause excessive leaf growth and very little to no flowers. If you need any further assistance, let me know.

Filed Under: Ask A Master Gardener

Tomatoes Slow to Ripen

September 2, 2019 By Don

Question
Hi Master Gardener,
For the first time ever, I planted tomatoes in 5 gallon buckets, using Schultz garden & vegetable dirt with 2″ mulch on top of dirt. They get 7-8 hours of sunshine, I water every day if no rain. The plants are 4-6 feet tall, healthy with the usual leaf production ( I pruned the suckers as the plants matured.) I planted seedling sprouts on May 1st. It is now 116 days later and the tomatoes are VERY VERY slow to redden ( ripen) There is a good quantity of fruit, but ripening seems to be extremely slow. Where am I wrong or is this common? Thank you Please email respond as I am anti telephone HA:)
Bill 

Answer by Master Gardener Bruce:

Good morning Bill,

Thanks so much for the information.  After answering a few questions, I feel you are doing everything right so I did some more research in solving your ripening problem.  This is what I came up with.  I looked for information on tomatoes ripening in a container vs ripening in the ground.  I couldn’t find any information on the difference if there is any.  Once the seedling is planted in the container it takes 2-3 months for tomatoes to be ready for harvest.  Which is about the same for inground tomatoes.  I did run across a study done at the University of Maryland with tomato ripening this year.  Enough potassium is required for the tomato to produce lycopene.  Lycopene is the agent that gives tomatoes there color.  With the massive rains received this year, they believe that the excess water may have inhibited the plants ability to absorb the potassium.  Their study shows the soil was rich in potassium but when they checked the plants, there was a low level of potassium found.  They don’t know why.  Since your tomatoes are container grown, maybe the excess rain washed all the nutrients out of your container causing a potassium deficiency.  You might try adding some potassium to your container and see if that corrects the problem.

Good luck and stay in touch!.


Filed Under: Ash, Ask A Master Gardener

Pruning Grape Vines

June 1, 2019 By Master Gardener

Question: How do you prune a grape vine?

Answer: Many varieties of grapes grow well in Indiana, and pruning is a vital part of successful grape production. Below is a general introduction to pruning and some resources for more detailed descriptions of the process.

You should start pruning your grape vine in its very first year. You want to create a T-shaped vine, with one trunk and two canes trained along each horizontal wire of the trellis. So, if you are starting a new vine, trim so that there is one primary vertical shoot – the trunk of the vine. As it reaches the horizontal wires of the trellis, you will want one main shoot, or cane, for each direction of the horizontal wires you are using to train the vine.

Pruning an established vine is essential for grape production, since grapes grow on one-year-old canes. Your goal is to prune the old wood to make room for the new wood, and to limit the number of buds so that the vine produces quality bunches of grapes. Common pruning errors include pruning at the wrong time and not pruning enough.

Prune grapes each year in late winter. Pruning too early can cause damage from freezing, so wait until the worst of the freezing temperatures are over. In Indiana, this might mean around the middle of February. For each side of each horizontal wire on your trellis, choose one new shoot, or cane, from last year, and cut off the rest. The cane should be about the thickness of your little finger. If there are more than 8-10 buds on the cane, trim off the excess buds. It may feel like you are leaving only a skeleton of your grape vine, but that will give you the best grape production. Remember: grape vines grow quickly, so if you make a mistake, you can fix it next year!

For photos and descriptions of all aspects of grape vine care, see “How to Prune Grape Vines” from Gardening Wizards at https://gardeningwizards.com/prune-grape-vines/.

More advanced pruning techniques involve the concept of “balanced” pruning; that is, leaving a number of buds appropriate to the cane size. For details, see “Growing Grapes in Indiana” from Purdue University Extension at https://ag.purdue.edu/hla/pubs/HO/HO-45.pdf.

For a detailed description of pruning for a number of varieties see “Principles and Practices of Pruning Grape Vines,” also from Purdue University Extension, at http://www.foodsci.purdue.edu/research/labs/enology/Pruninggrapes08.pdf.

– Barbara

Filed Under: Ask A Master Gardener, Fruits

Tomatoes and Container Gardening

July 18, 2018 By Master Gardener

Question: I am planning for my 2019 tomato garden already. What I want to do is grow 8-10 tomato plants in five gallon buckets. They will be “Beefmasters” and “Better Boys.” I plan to drill 5 to 6 1/2″ holes in the bottom of the buckets for drainage. I will fill the buckets about 2/3 full with a mix of potting soil and top soil and layer 2″ of mulch on the top of the soil. I plan to use seedlings bought at a local nursery and water every other day if there is no rain fall. Once the plants are tall enough, I will stake them with 1″  by 2″ treated lumber.
  •      Should I keep these buckets 36″ to 48″ apart, like a normal garden planting?
  •      Can the dirt be used for the next season’s tomatoes?
Answer: Thank you for your questions on container gardening.  First off, I admire your ability to plan one year out.  That is great. Please use the following guidelines when planting tomatoes in a 5 gallon bucket:
1.Drill holes in the bucket for drainage which is already in your plan.  Cover the holes with coffee filters or mesh to keep the soil in the bucket.
2. Either use a soilless mixture or a soil mixture.  Specific recommendations are made since soil compaction is a concern when growing in containers. A soilless mixture contains peat moss, vermiculite, and either coarse sand or a wood product.  A soil mixture contains peat moss, pasteurized soil, vermiculite, and cow manure.  If you plan on moving the buckets around, the soilless mixture is lighter.  However the soil mixture does a better job in holding water.
3. When fertilizing follow package directions.  You may not get the desired results if you use too much.  Start with a time release after planting.  In 2 weeks switch to a soluble balanced fertilizer such as 10-10-10.  When the blooms set, switch to a high potassium fertilizer like 9-15-30.
4. Keep the containers 3-4 feet apart as you mentioned.
5. Consider using light colored containers so they won’t absorb as much heat.  Plants may cook in a black container with hot weather.
6. Start with new soil each year.  Diseases and pests may multiply if you use the same soil each year.  It’s not worth the risk with all the planning and preparation you have done.
7. From what I have read Better Boy and Beefmaster should do well in containers.  You can also look at varieties that are tailored to container gardening such as Bush Early Girl, Patio Princess, Bushsteak, Super Bush Hybrid, and Husky Red, Gold, or Pink.

I hope this helps with your gardening plans for next year.  If you have any further questions, do not hesitate to submit your questions to Ask a Master Gardener.  Our goal is to make you successful in the garden.

– Bruce

Filed Under: Ask A Master Gardener

Japanese Beetles

July 9, 2018 By Master Gardener

Question:

What can I do about Japanese beetles? Is this just a bad year for them? This is our first year to have a garden at our new place and these little pests are flocking to my garden. My bean leaves are in shreds along with my pumpkin leaves. They are now starting on my okra.

Answer:

We feel your pain with the Japanese beetle outbreak this year. The past few years have been really tame and this year there are beetles everywhere. The life cycle of the Japanese beetle is 30-45 days. It lays its eggs in the ground a where it lives as a grub until next June when it will return to aggravate all us gardeners.

There are a couple of methods you can use to lessen the effect from the beetles. The first is the safest for all the pollinators since it does not involve using chemicals on the plants. Take a bucket, pail, or plastic cup with soapy water and pick the beetles off your plants and drop them into the soapy water. If you hold the bucket right under the beetles and tap the branch toward the bucket, many of the beetles will fall straight down into the water. You may need to make three trips a day to control the damage to your vegetables.

The second method is using Sevin in a spray bottle. Give the beetles a light spray as you see them. It takes very little Sevin to eradicate the beetles. Sevin is lethal to pollinators so avoid spraying the vegetable blooms. Sevin dust will work but it takes time for it to take effect on the beetle. It may eat a couple of leaves before it dies. Sevin spray is effective in seconds. Unfortunately these are the best treatments available.

– Bruce


Filed Under: Ask A Master Gardener Tagged With: Insects

Cracks in tomatoes

July 23, 2016 By Don

Question: why am I getting large cracks in my tomatoes?

Answer: Either you are overwatering your tomato plants, or, the ground was dry and suddenly you got a heavy rain, which could cause the fruit to grow and expand quickly, thus causing the crack.

Filed Under: Ask A Master Gardener

Vegetable Garden Woes

July 18, 2016 By Don

Question: When spring is cool and wet, how can I support healthy peppers and tomatoes?
Answer: Growing a successful vegetable garden in Indiana can certainly be a challenge. No two growing seasons are ever quite the same and it seems like we have different problems to deal with each and every year. When a year starts out with a cool and wet spring alternating with hot dry spells and heavy thunderstorms from time to time, this can make  growing vegetables difficult. In particular, peppers and tomatoes really prefer more consistent moisture as opposed to lots of rain with hot dry temperatures in between.
Here are a few suggestions and hopefully your will find one or more to be helpful.
1. Try mulching your tomatoes and peppers. I use straw and it seems to really help during the hot dry times. It is not too late to add straw, leaf, or grass mulch to the base of your plants. If you use grass just make sure that herbicides have not been applied to the grass you use in your garden.
2. Try watering with a soaker hose rather that can run for a few hours. This helps prevent run off and gives the plants a more consistent source of moisture. Watering in the morning is also best and make sure to water at the base of your plants so that their leaves do not get wet.
3. Most garden plants do much better when their location is rotated each year. This cuts down on disease and is much better for the soil.
4. Add some vegetable garden fertilizer and water in well.
5. Try adding some organic matter around your plants and work in lots of organic matter this fall when you put the garden to bed. The hard clay soil we have around Hancock County gets compacted very easily and keeps nutrients and moisture from entering the soil. If your garden soil appears to be compacted try breaking up the soil near your garden plants very carefully so that moisture and nutrients can penetrate. For this job I typically do it by hand with a small garden fork tool.
I have included a link to a Purdue University article about tomato problems.  https://hort.purdue.edu/ext/tomatotroubles.html
Thank you for contacting us and please feel free to do so again.

Filed Under: Ask A Master Gardener

Squash leaves turning yellow

July 15, 2016 By Don

Question from Angela

I am having trouble with my squash plants. The leaves are turning yellow and the squash are going bad before they get more than 3-4 inches long. Someone mentioned it might be a vine bore. How can I get rid of it and is there any chance of saving my plant?
Thanks

Answer from Master Gardener Bob

There are several possible reasons for your leaves turning yellow.  Please click on the following links which will give you three possible answers from different sources.  Good luck.

Yellow squash leaves 1

Yellow squash leaves 2

Yellow squash leaves 3


Filed Under: Ask A Master Gardener

  • « Previous Page
  • 1
  • 2
  • 3
  • 4
  • Next Page »

Upcoming Events

Notice
There are no upcoming events.

Designed by CCM · Log in